Leave Adjustments and Opening Balances
Leave adjustments are used to:
- Enter opening leave balances (e.g. when setting up a new payroll or employee), or
- Correct/adjust an accumulated leave balance
View written instructions
Step 1: Determine the Balance Required
Look at the current leave balance on the Balances tab in the Employee Master, and determine what the balance should be.
It's important to establish whether the Calculation Routine has already been run for the current period:
- If it has been run, the balance shown includes the current period's leave accrual.
- If it has not been run, the balance excludes the current period's leave accrual.
This matters because the Calculation Routine accrues leave for a period the first time it is run in that period — so knowing whether it's already run determines whether your opening balance entry should include that period's accrual or not.
Step 2: Calculate the Adjustment Required
Compare the balance required against what is currently shown on the Balances tab, and calculate the number of days by which the balance needs to be adjusted (increased or decreased).
Step 3: Confirm the Leave Adjustment Transaction Code Exists
When a payroll is created, a Leave Adjustment Transaction Code (default Code: 360) is automatically created and ready to use. To create one manually, or to create an additional adjustment code:
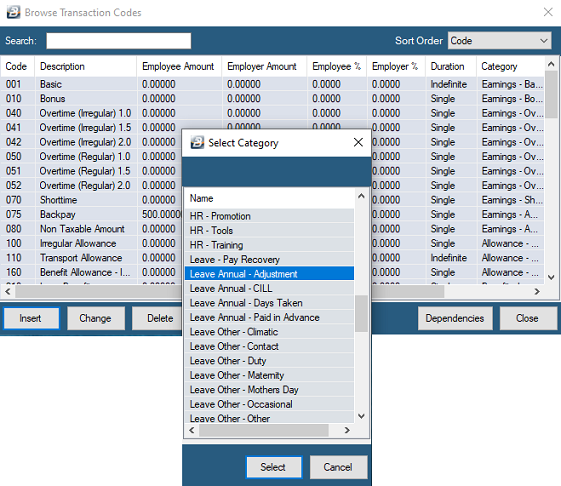
- Go to Edit, then Transaction Codes
- Check the existing list for a 'Leave Annual Adjustment' code
- If it doesn't exist, press Insert
- Select the Leave Annual - Adjustment Category
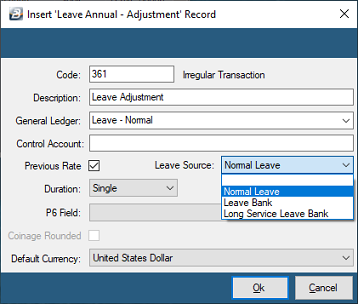
- Accept the default description, or change it as needed.
- An option lets the adjustment rate compute at the last rate of pay that applied
- The adjustment can be set to affect Normal Leave, Leave Bank, or Long Service Leave Bank
- Press OK to save the Transaction Code
Step 4: Process the Adjustment
- Go to Process, then Payslip Input (or another processing method suited to your workflow)
- Select the employee to be processed
- Press Insert
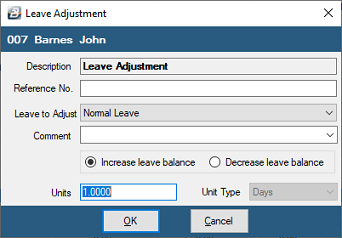
- Search for and select the Leave Adjustment Transaction Code
- Use the radio button to choose whether to Increase or Decrease the leave balance
- Enter the number of Units (days)
- Press OK to save
Step 5: Confirm the Result
After processing, check that the new leave balance is correct:
- Go to Edit, then Employee Master, select the employee, and check the Balances tab, or
- Run a Leave Summary report
The same Leave Adjustment Transaction Code and process is used both for entering brand-new opening balances (e.g. when onboarding an employee mid-year, or migrating from another system) and for correcting an existing balance later — the only difference is the number of days entered and whether you increase or decrease.
Was this page helpful?