EDI Bank Transfers
Having processed transactions, run a calculation routine, and checked the payroll for accuracy, you can generate an electronic data interchange (EDI) file for payroll disbursement. If this is your first payroll run, closely check to ensure that bank details have been correctly captured for all employees receiving payment by bank transfer.
Step-by-Step Setup
Step 1 - Setup the bank details for Employees being paid by transfer:
- Go to the Employee Master record and setup employee bank details.
Step 2 - Setup the Company (Organizational) bank details:
- Check whether the organization's bank account, from which payments are to be made to employees, was set up during the initial setup of the payroll. See the 'Company Details' topic.
Step 3 - Setup the Bank Transfer credentials:
- Go to Utilities > Exports > EDI Bank Transfers > Salaries/Wages.
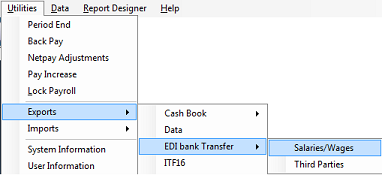
- Each bank has its own file format used for electronic transfer. If the bank transfer has been successful in prior periods, this setup is tried, tested, and requires no change. Press 'OK' to proceed with the export.
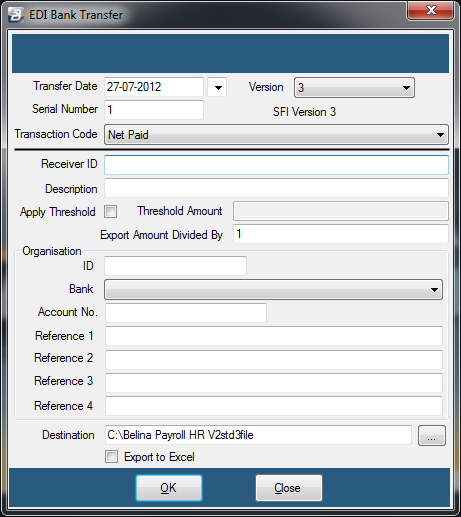
Field Explanations
| Field | Explanation |
|---|---|
| Period | Defaults to the current period, though you can select a prior period that may have been closed before making payment. |
| Transfer Date | The date the payment will be processed to employee accounts. |
| Serial Number / Batch No. | Version 4 layout uses a Serial number, while all other transfers use Batch numbers automatically generated by the system to identify the active batch. |
| Version | Select the export layout provided by your bank (e.g., Computer Society Version 4 (CSV4) or other bank-specific layouts). |
| Transaction Code | Select which Transaction Code to pay, most commonly the 'Net Paid' code. |
| Receiver ID | The code allocated by your bank to identify your organization. Many bank configurations no longer require a Receiver ID. |
| Description | Describes the payment being made. This text displays on your bank statement and on employee receipt statements. |
| Multi Currency Transfer | Tick this option if employees have amounts calculated in different currencies. This requires both employee and employer accounts in those currencies; otherwise, payments convert to the base bank currency. |
| Divide Export Amount By | Use if the organization needs to pay the total amount across multiple installments. |
| Threshold Amount | If total transfers should not exceed a specific threshold, any remaining balance carries over into subsequent transfers. |
| Set Export File Threshold | A rarely used feature allowing entry of a maximum value for the total EDI transfer. |
| Set Transaction Max Amount | Enables a cap on the maximum amount paid to an individual employee due to cash flow limits. The balance can be paid later using the 'Net already Paid' code. |
| Maximum Amount | The maximum allowable payout limit for any individual employee. |
| ID | Organization ID allocated by your bank. Many modern bank setups omit this field. |
| Bank | Selects the organizational bank account used to fund the payment if multiple accounts exist. |
| Reference 1 | Prompts for either the Employee Code or National ID as a transaction reference. |
| Reference 2 | Additional custom text reference for the transaction. |
| Reference 3 | Additional reference field, traditionally used for the company name (especially for Version 4 exports). |
| Reference 4 | Final optional custom reference field. |
| Destination | Specifies the target file and folder path for the generated export. |
| Export to Excel | Determines whether the exported file is generated in Excel format or standard text format based on bank requirements. |
Step 4 - Checks:
You will be given an opportunity to print a 'Bank Export Control Report'. This report displays the number of employees and the total wage bill. Verify that the number of employees matches or reconciles with the 'Earnings Summary' or 'Payslip Summary' reports. After viewing, close the report by clicking the red (X) at the top right and follow the screen prompts.
Step 5 - File Generation:
After viewing the report, the transfer file will be automatically generated to your specified file location. If SFI version 4 is selected, a file named Std4file is saved; alternative filenames are assigned for other banks. These files can be copied onto physical media or transferred electronically to your bank.
Was this page helpful?